>

serendipitous reflections

Sunday, June 29, 2008

Banana bread contest

Jeni was invited to enter her Grandma Staker's Banana Bread recipe into a banana bread contest. If you've known Jeni long enough, you've had her banana bread, and you know how good it is, so please go over and give her a vote.

Here's the recipe on her kitchen blog.

Labels: , ,

Saturday, January 19, 2008

Dinner request from Trinity

This was too funny ... last night I pulled out some older cookbooks for Jeni from Bluefield. These are community cookbooks that she's had forever, it seems. One of the cookbooks had a post-it note in it with Trinity's name and a big asterisk on it. Funny after not living in Bluefield for 11 years that we still have this post-it beside this recipe. I guess we'll have to fix this if Trinity comes to visit...

Labels: ,

Wednesday, June 06, 2007

New recipes are up...

New recipes are posted over on Kitchen Sherpa. Check 'em out!

Labels:

Wednesday, April 04, 2007

Kitchen Sherpa

Jeni's kitchen blog -- Kitchen Sherpa -- is up with it's first recipe! Check it out, and then check back for more great recipes and kitchen tips.

Labels: ,

Sunday, March 25, 2007

Mark it with a "G" for Gracie and me!

This is the individual birthday cake Jeni baked for Gracie. Lisa, Brian, Gracie and Clara Ann were going to visit on Saturday, but we were pressure washing the fence all day Saturday and Lisa and Brian ended up heading to the beach instead. Watch for an upcoming link because Jeni's been working on plans for a kitchen/recipe blog and plans to make this her first recipe with many other great recipes and tips to follow.

Labels: , , ,

Sunday, January 22, 2006

Shrimp Sate with Pineapple Salsa

Just before New Years, I did another cooking day with Bill and Barbara's kids. We decided to do all appetizers. It was a lot of fun and all the food turned out awesome.


I just loved this recipe. It was very simple and full of big flavor. The pineapple salsa is perfect just by itself.

A couple of things that I did differently from the recipe:
1. I did use canned pineapple chucks mainly to save time. If you use canned make sure to drain the pineapple.
2. Also I let the shrimp marinate in the refrigerator for about 30 minutes before I grilled them.

Shrimp Sate with Pineapple Salsa
(Cooking Light magazine)

Salsa:
3/4 C finely chopped pineapple
1/4 C finely chopped red onion
1 Tablespoon minced seeded jalapeno pepper
1 Tablespoon chopped fresh cilantro
1 Tablespoon cider vinegar
1 teaspoon honey

Sate:
2 Tablespoons chopped fresh mint
2 Tablespoons fresh lime juice
1/4 teaspoon salt
1/4 teaspoon chili powder
24 large shrimp, peeled and deveined
8 wooden skewers (6")

To prepare salsa, combine first 6 ingredients in a medium bowl.

To prepare sate, combine mint, juice, salt, and chili powder in a large bowl; add shrimp, tossing gently to coat. Thread 3 shrimp onto each skewer. Place shrimp on a preheated grill (coated with cooking spray); grill 1-2 minutes on each side or until shrimp turn pink. Serve with salsa. Garnish with cilantro sprigs, if desired.

Yields 4 servings (2 skewers and 1/2 C salsa)
Calories 208; fat 3g; protein 34.9g; carbs 8.7 g

Posted by Picasa

Labels:

Chicken Sate with Peanut Sauce


I am always on the lookout for a good chicken sate with peanut sauce recipe, and this one is pretty good. The peanut sauce had a nice little kick with crushed red pepper, and the sate had a good sweet and spicy taste.

My changes:
I used freshly grated ginger instead of bottled ground fresh ginger.
I also let the chicken marinate for about 30 minutes before grilling instead of 10 minutes.

If you don't have a grill, you can broil these instead. Place on a broiler pan coated with cooking spray; broil eight to 10 minutes, turning once.

Chicken Sate with Peanut Sauce
(Cooking Light magazine)

Sate:
1 lb skinless, boneless chicken breasts, cut into 8 strips (or 8 chicken tenders)
1 Tbl light brown sugar
2 1/2 Tbl low-sodium soy sauce
2 teaspoons bottled ground fresh ginger (such as Spice World)
1 tsp grated lime rind
1/4 tsp crushed red pepper
2 garlic cloves, minced

Sauce:
1 Tbl light brown sugar
1 1/2 Tbl low sodium soy sauce
1 Tbl fresh lime juice
2 Tbl natural-style, reduced fat creamy peanut butter (such as Smucker's) (I just used what I had in the cabinet--Jiff)
1/4 tsp crushed red pepper
1 garlic clove, minced
Cooking spray
8 wooden skewers

To prepare sate, combine brown sugar, soy sauce, ginger, lime zest, red pepper, and garlic in a medium bowl; add chicken. Let stand 10 minutes.

To prepart sauce, combine brown sugar, soy sauce, lime juice, peanut butter, red pepper and garlic in a medium bowl; stir until sugar is dissolved.

Thread chicken onto wooden skewers. Place chicken on a preheated grill coated with cooking spray; grill 5-7 minutes on each side or until chicken is done. Serve chicken with sauce.

Yields 4 servings (2 skewers and 1 Tbl sauce)
Calories 205; fat 4.5g; protein 29.3g; carb 11.2g
Posted by Picasa

Labels:

Sage Sausage Bites with Balsamic Apricot Dipping Sauce


Well my girl, Rachael Ray, came through again. These were such a hit at the dinner, there weren't any left to bring home. The dipping sauce is fabulous!

The only change I made to this recipe was to add the bread crumbs in to the meat and then formed the balls instead of rolling them in the bread crumbs.


Sage Sausage Bites with Balsamic Apricot Dip
Recipe courtesy Rachael Ray

1 tablespoon evoo -- extra-virgin olive oil, 1 turn of the pan
1/2 onion, chopped
1 1/4 pounds bulk Italian sweet sausage meat
3 tablespoons chopped fresh sage, 4 or 5 sprigs, slivered
1/4 cup balsamic vinegar, eyeball it
1 cup apricot all-fruit spread or, apricot preserves
1/2 cup spicy brown mustard
1 cup Italian bread crumbs, a couple of handfuls

Preheat a small pot over medium heat and the oven to 425 degrees F.

To the pot, add oil and onion. Saute the onion for 1 minute.

In a mixing bowl, combine sweet sausage and chopped sage.

Next, add balsamic vinegar to onion and reduce by half, 1 minute. Remove vinegar from heat and combine with apricot all-fruit spread or preserves and spicy mustard. Stir until mustard is fully incorporated. Dip will be glossy and brown in color.

Add 2 tablespoonfuls of apricot dip to bulk sausage and mix. Form meat into bite size nuggets, coat in bread crumbs then place on nonstick cookie sheet. Recipe will make 20 to 24 pieces.

Bake 15 to 17 minutes, until evenly browned, turning occasionally. Drain, then serve with party picks for dipping with remaining balsamic apricot mustard dip.

Recipe Summary
Difficulty: Easy
Prep Time: 10 minutes
Cook Time: 12 minutes
Yield: 8 servings
Posted by Picasa

Labels:

Chicken Nuggets with Honey Mustard


These are some of my favorite chicken nuggets. I have made these several times because they are so easy and so yummy.

The changes:
1. I used barbecue flavored chips on these because the kids didn't like sour cream and onion.
2. I bake them in a cast iron grill pan, but a cookie sheet will work also.
3. I used about 3 cups of chips when I made mine. Also don't completely crush the chips. They are best if the chips still have some shape to them. And if you are having trouble getting the chips to stick to the chicken, I would sort "crush" the chips into the chicken by putting some chips in my hand and then the chicken piece and squeeze it.

Chicken Nuggets with Honey Mustard Dipping Sauce
Recipe courtesy Paula Deen

2 cups crushed sour-cream-and-onion-flavored potato chips
1 egg
2 tablespoons milk
6 chicken breast fillets, cut into 1 1/2-inch cubes
1/3 cup butter, melted
Honey Mustard, recipe follows or store bought

Preheat the oven to 350 degrees.

Spread the crushed potato chips in a shallow dish. Beat together the egg and milk in a shallow bowl. Dip the chicken cubes into the egg mixture and then dredge them in the chips. Place the chicken nuggets on a baking sheet and drizzle with melted butter. Bake for 15 to 18 minutes, or until golden brown. The chicken nuggets can be frozen after baking. Serve with your favorite sauce, such as honey mustard or ranch dressing.

Honey Mustard:
3/4 cup mayonnaise
3 tablespoons honey
2 tablespoons yellow mustard
1 tablespoon lemon juice or juice from 1/2 lemon
Horseradish, to taste
2 tablespoons orange juice (more or less as needed)

Combine all ingredients except orange juice; stir well. Thin to pouring consistency for dressing or dipping consistency for dips with orange juice. Cover and chill for 2 or 3 hours.

Yield: 1 1/4 cups

Posted by Picasa

Labels:

Coconut Snowmen


For dessert, we made these little coconut snowmen. They were very cute, but you have be ready to get your hands cold. The crucial step is to get them into the freezer fast.

We did do a few things differently:
1. Some of the kids didn't like coconut, so we rolled the ice cream in pecans or mini chocolate chips.
2. Obviously we didn't make the marzipan noses, we just used mini chocolate chips for the face and buttons. (The kids didn't like licorice either.) And we couldn't find chocolate wafers, so our hats didn't have brims. (oh well)
3. We also made a chocolate sauce to set the snowmen in. This added an extra layer of sugary goodness, but next time I would just buy some hot fudge.
4. The best tip I can give you is to use a wooden skewer to secure the ice cream balls. We put a skewer in the middle of the large ice cream ball and built up from there.

Overall everything turned out really good and the kids really enjoyed themselves.

The cool thing about this recipe is I have had it for 5 years in my binder of Martha recipes and have wanted to make it. Martha had Susan Lucci and her daughter Liza Huber, on her show, and they had tried to make the snowmen once, and it didn't go very well. Martha showed them how to make them, which in turn made me want to make them. So there you have it....


Coconut Snowmen
(makes 4 snowmen)

2 1/2 pints best-quality vanilla ice cream
2 seven-ounce packages coconut
Orange food coloring
1 tablespoon marzipan (1/4 ounce)
40 Sen Sen licorice candies
4 marshmallows
4 chocolate wafers
Sifted confectioners’ sugar

1. Line a baking pan that fits in your freezer with parchment paper. Scoop the vanilla ice cream, rounding scoops as much as possible, until you have 4 of each size, and place on the prepared baking pan. Place the pan in the freezer to harden for 15 minutes.

2. Remove the ice cream from the freezer, and roll in coconut. Return to pan, then return the pan to the freezer. Add orange food coloring to marzipan until carrot color is attained. Shape marzipan into small carrot shapes, using a paring knife to make ridges. Remove 1 small scoop of ice cream at a time from the freezer, and make faces using Sen Sen for eyes and mouth and marzipan carrots for the nose. Return to freezer until ready to serve.

3. Remove middle-size scoops from the freezer one at a time; place Sen Sen in a row down the front to create buttons. Remove remaining scoops from freezer, and stack to create snowmen, pressing slightly to adhere. Return snowmen to freezer.

4. Make the top hats by roasting marshmallows on skewers over a gas burner. Alternatively, place marshmallows on a baking sheet under the broiler, and cook until browned, rotating every few seconds. Place the toasted marshmallow on the chocolate wafer, and dust with sifted confectioners’ sugar. Place the hat on the snowmen just before serving.

Note: To make these snowmen, you will need three ice-cream scoops in varied sizes. Shoestring licorice cut into small pieces can also be used for the buttons, eyes, and mouth. This recipe adapted from Martha Stewart Living (December 2000).

Posted by Picasa

Labels:

Wednesday, November 30, 2005

Coconut Cake


A couple of weeks ago we had Dr. Jones and Barbara over for her birthday dinner. Instead of getting a bakery cake, I made this cake. It's a Martha Stewart recipe that I've had for years. It's one of my step-mom and dad's favorites. Come to think of it, it's probably one of my favorites too. I've never made this cake where people just don't fall in love with it. It's a little time consuming, but worth every minute, I promise. Please make sure to read through the whole recipe before making it.

Coconut Cake
makes three 6" layers*

2 C sifted cake flour (not self-rising)
1/2 tsp baking powder
1/2 tsp baking soda
1/4 tsp salt
3/4 C (1 1/2 sticks) unsalted butter, room temp, plus more for pans
1 C superfine sugar
4 large egg yolks, lightly beaten (reserve 2-3 eggs whites for frosting)
2/3 C sour cream
1 tsp pure vanilla extract
Coconut-Cream Filling (recipe follows)
11 ozs sweetened angel flake coconut
Seven-Minute Frosting (recipe follows)

Heat the oven to 350. Arrange two racks in the center of the oven. Line the bottom of three 6"x2" buttered cake pans with parchment paper.** Dust the bottom and the sides of the cake pans with flour and tap out any excess. Sift together the flour, baking powder, baking soda, and salt; set aside.

Cream the butter on medium-low speed until fluffy, 1 to 2 minutes. Gradually add the sugar, and keep beating until the mixture is fluffy and light in color, about 3 minutes. Gradually drizzle in the egg yolks, beating on medium-low speed between each addition until the batter is no longer slick. Beat until mixture is fluffy again, about other 3 minutes.

Alternate adding the flour mixture and sour cream to the batter, a little of each at a time, starting and ending with the flour mixture. Beat in the vanilla. Divide the batter between the prepared pans. Bake 30 to 40 minutes, rotating the pans in the oven, if needed, for even browning, until a cake tester inserted into the center comes out clean. Transfer cake pans to wire racks to cool, about 15 minutes. Remove cakes from the pans, and let cool completely on racks with tops up.

To assemble, remove the parchment paper from the bottoms of the cakes. Split each layer in half horizontally with a serrated knife. Set aside the prettiest dome; it will be used for the final layer. Place another domed layer, dome side down, on a serving platter. Sprinkle 2-3 tablespoons of coconut over the cake. Spread a generous 1/2 C of coconut-cream filling over the coconut flakes. Repeat sprinkling and spreading process on the remaining layers are used. Top the cake with the reserved domed layer. Transfer the cake to the refrigerator to firm, 1-2 hours. Remove from the refrigerator, and frost the outside of the cake with seven-minute frosting. Sprinkle the remaining coconut flakes all over the cake while the frosting is soft; do not refrigerate. Cake can be left out at room temperature for several days. (I toasted the coconut for the outside. It is not necessary to toast it.)

Coconut-Cream Filling
makes 4 cups

6 large egg yolks
3/4 C sugar
6 Tbl cornstarch
1/8 tsp salt
3 C milk
4 ozs (1 1/2 C) sweetened angel flake coconut
1 1/2 tsp pure vanilla extract
1 tsp unsalted butter for coating plastic wrap

Place egg yolks in a large bowl; whisk to combine; set bowl aside. Combine sugar, cornstarch, and salt in a medium saucepan. Gradually add milk, whisking constantly. Cook, stirring, over medium heat until mixture thickens and just begins to bubble, 10-12 minutes. Remove from heat.

Whisk 1/2 C hot sugar mixture into reserved yolks to temper.*** Slowly pour warmed yolks into saucepan, stirring constantly. Cook, while continuing to stir, over medium heat until mixture just begins to bubble, 2 minutes. Remove from heat. Stir in coconut and vanilla.

Transfer the filling to a medium mixing bowl. Lightly butter a piece of plastic wrap, and place it directly on top of the filling to prevent a skin from forming. Transfer the filling to the refrigerator until firm and chilled, at least one hour.**** The filling may be made a day ahead.

Seven-Minute Frosting
makes 3 cups

2-3 large egg whites
1 1/2 C sugar
2 tsp light corn syrup
1/4 tsp cream of tartar
1/2 tsp pure vanilla extract

Combine egg whites, sugar, corn syrup, and cream of tartar with 5 tablespoons of cold water in top of a double boiler. Fill bottom of double boiler with 2"-3"of water; top pan should not touch water. With water boiling vigorously, beat egg mixture using a hand mixer on medium-low for 4 minutes, then on high for 3-4 minutes. Remove from heat. Add vanilla; continue to beat on high until icing holds its peaks, 3-5 minutes more; do not overmix or icing can get grainy.*****


* The recipe calls for 6" pans, but I used 8" pans because that's what I have. I generally just add little more of each ingredient in the cake recipe. Or I just follow the recipe and have thinner layers, but I reduce the baking time.
**I also butter my parchment paper, then flour it.
*** Tempering the egg yolks is a must. You must constantly stir when pour in the hot liquid or you will have scrambled eggs.
****I have made this recipe a dozen or more times and you really need to refrigerate this filling overnight. If you don't have that kind of time, then at least 3 hours. It helps the cake set up better when you are building it.
*****If the weather is humid, beat the icing for an additional minute in each step to help stiffen it.
Posted by Picasa

Labels:

Thursday, November 17, 2005

Artichoke-stuffed mushrooms

I made these mushrooms about month ago for Tish's birthday dinner. They were a hit. I suggest doubling the recipe if you are having more that 8 people. They are super easy and super yummy. The recipe came from Southern Living (Dec 96, I believe).

Artichoke-Stuffed Mushrooms

1 1/2 lbs large fresh mushroom, button or baby portobellas
1/4 C finely chopped onion
2 garlic cloves, finely chopped
1 Tbl olive oil
1/4 C dry white wine
1/4 - 1/2 C soft breadcrumbs
1 (14 oz) can artichoke hearts, drained and chopped
3 green onions, chopped
1/2 C grated Parmesan cheese
1/2 C mayonnaise
1/4 tsp salt
1/4 tsp pepper

With a damp cloth, gently wipe the dirt off the mushrooms. (Rinsing them water will make them tough.) Remove stems, and chop; reserve mushroom caps.

Saute mushroom stems, onions, and garlic in hot oil in a large skillet over medium heat 5 minutes or until onion is tender.

Add wine, and cook 2 minutes or until liquid evaporates. Stir in breadcrumbs. Remove from heat and let cool.

Combine onion mixture, artichoke, and next 5 ingredients. Spoon 1 teaspoonful into each cap. Place on a lightly greased rack in a roasting pan. *

Bake at 350 for 12 to 15 minutes or until golden.

*You can make these up ahead of time, just cover and refrigerate them uncooked, pull them out right before guest are to arrive and bake them.

Labels:

Tuesday, November 08, 2005

Balsamic-Glazed Chicken Sandwiches with Red Onions and Goat Cheese


I made these chicken sandwiches on Saturday night and they were wonderful. Honestly they were some of the simplest sandwiches to make and so full of flavor, and in the grand scheme of things pretty healthy. (calories 424, fat 11.6g - 4.2g sat and 4.4g mono, protein 30.1g, carbs 43.9g--the bun) I've had this recipe for a year, and this is the first time I've made it. It was in Cooking Light magazine November 2004.

Balsamic Glazed Chicken Sandwiches with Red Onions and Goat Cheese

3/4 C balsamic vinegar
1/2 C dry red wine
2 tsp brown sugar
1 tsp soy sauce
2 (6 oz) chicken breasts, boneless, skinless
1/2 tsp salt
1/4 tsp ground black pepper
cooking spray (Pam)
1 Tbl olive oil
1 1/2 C thinly vertically sliced red onion
1 (3 oz) package goat cheese
4 hoagie or Kaiser rolls
1 C trimmed arugula or baby spinach

Combine the first 4 ingredients in a small saucepan over medium heat. Bring mixture to a boil, stirring until sugar dissolves. Cook until reduced to 1/3 cup (about 12 minutes). Remove from heat; cool slightly.

While vinegar mixture cooks, heat a large non-stick skillet over medium high heat. Sprinkle chicken with salt and pepper. Coat pan with cooking spray. Add chicken to pan; cook for 6-8 minutes on each side or until done. Remove chicken from pan and thinly slice. Cover and keep warm.
(Please note my changes at the bottom)
Add oil to pan, reduce temperature to medium low. Add onion; cook 5 minutes or until onion is soft and beginning to brown, stirring frequently. Remove from heat.

Spread about 1 1/2 TBL goat cheese evenly over the bottom half of the roll; divide sliced chicken and onion evenly over rolls. Drizzle each serving with about 1 TBL balsamic mixture, and top with 1/4 C arugula or baby spinach. Serve immediately.

My changes:
Instead of cooking the onions after the chicken was cooked, I used another pan and cooked them at the same time so everything was hot when the sandwiches were served. The other change I made was to add the sliced chicken back into the skillet and pour the balsamic mixture over the chicken so all the chicken was coated with the mixture. Then I put the sandwiches together.


Posted by Picasa

Labels:

Tuesday, October 18, 2005

Cauliflower Soup with Tuffle Oil


When I was out in Iowa visiting my friends Tracey and Clay, Clay and I talked about a ton of recipes. So one night he fixed this cauliflower soup. I loved it. I'm a huge fan of cauliflower. When I got home I decided I needed to make it for Dean, so last week I did. It was awesome!

I did use the truffle oil on top - but here are a couple of tips about truffle oil. Truffle oil is for flavoring, it's not for cooking like olive oil. It is sort of expense (1.2 ozs = $13.00) but you only use a little, and I mean little bit of it. It is very pungent and "a little dab will do ya." In the picture above I actually used a little too much, so be very careful when flavoring with it.

The recipe came for one of Clay's favorite websites - Epicurious.com.


CAULIFLOWER SOUP WITH WHITE TRUFFLE OIL

The truffle oil is not essential, but it's a nice indulgent touch. Since the oil's flavor dissipates with heat, add the oil to this first-course soup just before serving.

2 tablespoons (1/4 stick) butter
1 large onion, finely chopped
1 pound cauliflower florets (about 5 cups)
2 14 1/2-ounce cans low-salt chicken broth
1 teaspoon white truffle oil* or extra-virgin olive oil
1 tablespoon thinly sliced chives

*White truffle oil is available at Italian markets, many specialty foods stores and some supermarkets.

Melt butter in heavy large pot over medium heat. Add onion and sauté until tender, about 8 minutes. Add cauliflower and sauté 2 minutes. Add broth. Cover and simmer until cauliflower is tender, about 25 minutes.

Working in batches, transfer soup to blender and purée until smooth. Return soup to pot. (Soup can be prepared 1 day ahead. Cool slightly. Cover and refrigerate.) Bring soup to simmer. Season to taste with salt and pepper.

Ladle soup into bowls. Drizzle truffle oil over. Garnish with chives.

Serves 6 as a first-course.
Bon Appétit
February 1999 Posted by Picasa

Labels:

Thursday, October 13, 2005

Golden Potato-Leek Soup and Rosemary-Ham Scones


potato leek soup Posted by Picasa

I made this soup this other night and it was wonderful. It has just a little twist on good ol' potato soup. I got this recipe from Cooking Light magazine. The scones are so tasty and easy. They are really good with soups and salads. I usually use prosciutto instead of ham, but a maple ham or brown sugar ham is great in these. Thanks Rachael Ray.

Golden Potato-Leek Soup

1 Tbl butter
3 C thinly sliced leek (about 3 medium)
6 C cubed peeled Yukon gold potatoes (about 2 1/4 lbs)
2 C water
1/2 tsp salt
2 (14 oz) cans organic vegetable broth (Swanson)
2 thyme sprigs
1/3 C whipping cream
1/4 tsp freshly ground pepper

Melt butter in a Dutch oven over medium heat. Add leek, cook 10 mins or until tender; stirring occasionally (do not brown).

Add potatoes, water, salt, broth and thyme sprigs. Bring to a boil, reduce heat, and simmer, uncovered, 20 mins or until potatoes are very tender.

Remove pan from heat; discard thyme sprigs. Partially mash potatoes with a potato masher; stir in cream. Sprinkle with black pepper.

Rosemary and Ham Scones

1 box biscuit mix (recommended: Jiffy)
3 tablespoons finely chopped rosemary, 4 small stems
1/2 cup cream
A couple pinches salt
3 pieces deli-sliced glazed smoked ham, chopped, about 1/8 pound
1 tablespoon orange zest
2 teaspoons sugar

Preheat oven to 375 degrees F.

Mix together biscuit mix, rosemary, cream, salt, ham and orange zest. Pile mixture into 4 large mounds or 8 small mounds onto a nonstick cookie sheet. Sprinkle with a little sugar and bake. Bake scones for 10 to 12 minutes for large scones, 7 to 8 minutes for small scones.

Labels:

Tuesday, October 11, 2005

Banana-Nut-Chocolate Chip Quick Bread


banana nut chocolate chip bread Posted by Picasa

Carmen, Cathy's sister-in-law, asked me for a banana nut bread recipe and I have misplaced my grandmother's recipe so I tried this one from Eating Well magazine. It turned out wonderfully. It was so moist and yummy. I took a loaf to Atlanta a couple of weekends ago, and it was gone. A little cream cheese on this bread is a nice addition.

Banana-Nut-Chocolate Chip Quick Bread

Quick bread Dry Mix (whisk together)
1 1/2 C whole-wheat pastry flour or whole-wheat flour
1 C all purpose flour
1 1/2 tsp baking powder
1 tsp ground cinnamon
1/2 tsp baking soda
1/4 tsp salt

1/4 tsp ground nutmeg
2 large eggs
1 C nonfat buttermilk
2/3 C brown sugar
2 Tbsp butter, melted
2 Tbsp canola oil
1 tsp vanilla
2 C diced bananas
1/2 C chopped toast walnuts, plus more for topping if desired
1/2 C mini chocolate chips

Preheat oven to 375 for muffins, mini loaves and mini bundts or 350 for a large loaf pan. Coat pan(s) with cooking spray.

Prepare Quick Bread Dry Mix, adding nutmeg to it.

Whisk eggs, buttermilk, brown sugar, butter, oil, and vanilla in a large bowl until well combined.

Make a well in the center of the dry ingredients, pour in the wet ingredients and stir until just combined. Add bananas, walnuts, and chocolate chips. Stir just to combine; do not overmix. Transfer batter to the prepared pan(s). Top with additional walnuts, if desired.

Bake until golden brown and a wooden skewer inserted into the center comes out clean, 22 to 25 mins for muffins and mini bundts, 35 mins mini loaves, 1 hour 10 mins for large loaf.** Let cool for 10-15 mins, then turn out onto a wire rack. Let cool completely before storing.

Makes 12 servings

** Please watch the bread carefully. I have changed the baking temperature slightly from the original recipe because I almost burnt my bread with the temp they suggested.

Labels:

Wednesday, September 28, 2005

Chicken Satay Stir-fry with Orange scented Jasmine Rice


I just love chicken satay with peanut sauce, and I've been trying our a whole bunch of different recipes for it. This one is from my girl Rachael Ray. The peanut sauce turned out wonderfully. This was only the second time I've cooked with Jasmine rice and I will definitely make this rice again. It would go perfectly with just about any kind of chicken, well maybe not barbecue unless it has a hint of orange in the sauce. I highly recommend this recipe for people who like Thai food and want to try making it at home.

Chicken Satay Stir-fry with Orange Scented Jasmine Rice

3 3/4 cups water
2 oranges, zested
2 cups jasmine rice, rinsed
2 tablespoons canola or safflower oil, 2 turns of the pan
1 1/2 to 1 3/4 pounds chicken breast tenders, 2 packages, sliced on an angle into bite-size pieces 3 cloves garlic, crushed
1 medium yellow skinned onion, sliced
1 red bell pepper, seeded, quartered and sliced
1 cup shredded carrots, store bought, or 2 medium carrots cut into matchsticks
6 scallions, cut on an angle into 2 inch pieces
1 cup snow peas, a couple of handfuls

Satay sauce:
4 rounded tablespoonfuls chunky peanut butter
3 tablespoons dark soy, Tamari
3 tablespoons honey
1-inch ginger root, peeled and minced
1 clove garlic, crushed
1 teaspoon crushed red pepper flakes
1/2 orange, juiced

Garnish:
2 ounces (1/4 cup) chopped peanuts or nut topping, available on the baking aisle
2 to 3 tablespoons chopped cilantro leaves or flat-leaf parsley, for garnish
2 to 3 tablespoons chopped fresh basil leaves

Heat water with orange zest to boiling. Add rice, return to boil, stir. Cover pot and reduce heat to simmer. Cook rice until tender, 18 minutes. Fluff with fork.

For stir-fry, heat a large nonstick skillet over high heat. Add chicken, garlic and onion, stir-fry 3 minutes. Add remaining veggies and stir-fry 5 minutes more. Heat all ingredients for sauce together in a small pot over low heat, stirring the sauce until all ingredients are combined.

Transfer stir-fry to a large platter and pour sauce evenly over the chicken and vegetables. Sprinkle the platter with chopped nuts, cilantro, and basil. Serve jasmine rice in a separate dish with an ice cream scoop to serve the rice with -- it makes perfect, pretty, round portions of rice on the dinner plates.

Posted by Picasa

Labels:

Thursday, September 08, 2005

Peanut butter cookies and "Neiman Marcus" cookies


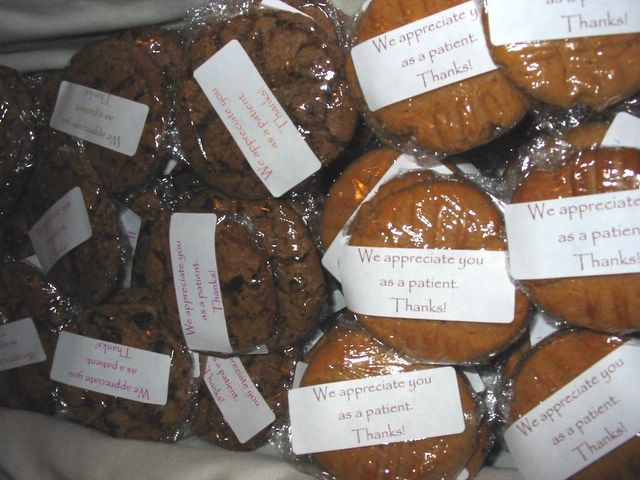
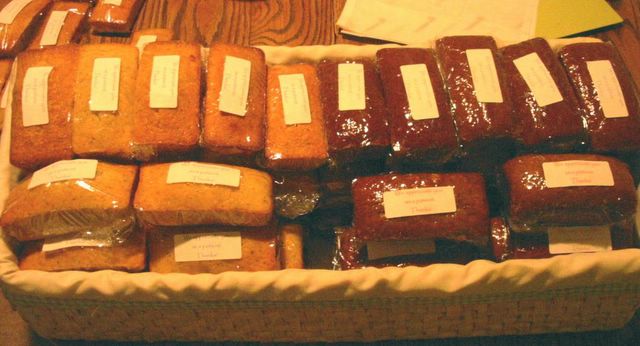
For the mid-week snack for Patient Appreciation week, I made 280 cookies, peanut butter and chocolate chocolate chip. The chocolate chip cookies come with a story. I have since found out it isn't true, but I've been making the cookies for 10 years with the assumption it was true. Honestly it doesn't matter because they are awesome! The peanut butter cookies are super simple and very tasty. The chocolate chip cookies are worth every minute in the kitchen.

sidenote: Thanks Tiff for putting on the stickers before we left for the beach.

The Neiman-Marcus Cookie Story
My daughter & I had just finished a salad at Neiman-Marcus Cafe in Dallas & decided to have a small dessert. Because our family are such cookie lovers, we decided to try the "Neiman-Marcus Cookie". It was so excellent that I asked if they would give me the recipe and they said with a small frown, "I'm afraid not." Well, I said, would you let me buy the recipe? With a cute smile, she said, "Yes." I asked how much, and she responded, "Two fifty." I said with approval, just add it to my tab.
Thirty days later, I received my VISA statement from Neiman-Marcus and it was $285.00. I looked again and I remembered I had only spent $9.95 for two salads and about $20.00 for a scarf. As I glanced at the bottom of the statement, it said, "Cookie Recipe - $250.00." Boy, was I upset!! I called Neiman's Accounting Dept. and told them the waitress said it was "two fifty," and I did not realize she meant $250.00 for a cookie recipe. I asked them to take back the recipe and reduce my bill and they said they were sorry, but because all the recipes were this expensive so not just everyone could duplicate any of our bakery recipes....the bill would stand. I waited, thinking of how I could get even or even try and get any of my money back.
I just said, "Okay, you folks got my $250.00 and now I'm going to have $250.00 worth of fun." I told her that I was going to see to it that every cookie lover will have a $250.00 cookie recipe from Neiman-Marcus for nothing. She replied, "I wish you wouldn't do this." I said, "I'm sorry but this is the only way I feel I could get even," and I will.

So went to the Neiman Marcus website and this is what they had to say about it.

NM Chocolate Chip Cookie Recipe***

An urban myth is a modern folk tale, its origins unknown, its believability enhanced simply by the frequency with which it is repeated. Our signature chocolate chip cookie is the subject of one such myth. If you haven't heard the story, we won't perpetuate it here. If you have, the recipe below should serve to refute it. Copy it, print it out, pass it along to friends and family. It's a terrific recipe. And it's absolutely free.

Ingredients
1/2 cup unsalted butter, softened
1 cup brown sugar
3 tablespoons granulated sugar
1 egg
2 teaspoons vanilla extract
1/2 teaspoon baking soda
1/2 teaspoon baking powder
1/2 teaspoon salt
1-3/4 cups flour
1-1/2 teaspoons instant espresso powder, slightly crushed
8 ounces semisweet chocolate chips

Cream the butter with the sugars until fluffy.

Beat in the egg and the vanilla extract.

Combine the dry ingredients and beat into the butter mixture. Stir in the chocolate chips.

Drop by large spoonfuls onto a greased cookie sheet. Bake at 375 degrees for 8 to 10 minutes, or 10 to 12 minutes for a crispier cookie. Makes 12 to 15 large cookies.

***I personally have not this recipe.

OK, enough about the origin of the cookie recipe - here is the recipe I use. It is absolutely one of my favorite cookies, and my stepmother loves them also. I do recommend a heavy duty mixer to make these or mix them by hand in the later stages of the process.
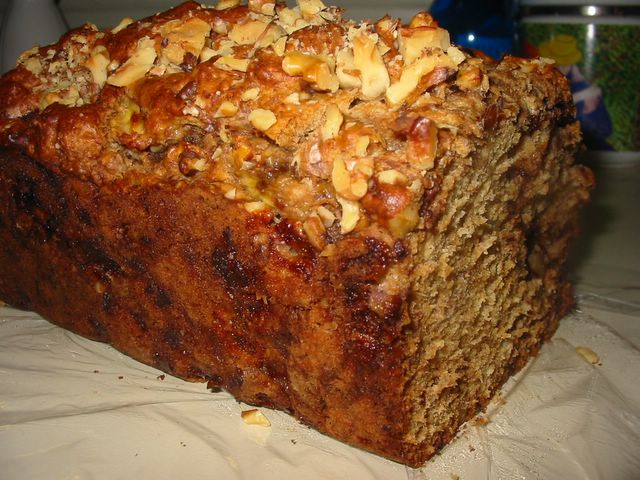
Chocolate Chocolate Chip Cookies
5 C old fashioned rolled oats
8 oz semi-sweet chocolate
1 lb (4 sticks) butter, softened
2 C sugar
2 C light brown sugar
4 large eggs
2 tsp vanilla
4 C all-purpose flour
2 tsp baking powder
2 tsp baking soda
1 tsp salt
24 oz chocolate chips

Preheat oven to 375. Line 4 cookie sheets with parchment paper. (You have to use parchment paper!!)

In a food processor, grind oats into a fine powder. Coarsely chop chocolate and grind with oats. The finer the powder, the better the cookies.

Cream the butter and sugars together. Add eggs and vanilla; mix well. In another bowl, combine flour, baking powder, baking soda, and salt. Then gradually beat flour mixture into the butter mixture.

Use a HEAVY DUTY MIXER or hands-- add oats mixture and beat it in. Use hands to work chocolate chips in the dough.

Make balls of dough about twice the size of golf balls - 12 per sheet (I use professional baking sheets and they are bigger than the average baking sheet. So use your judgment when putting these on the sheets because you don't want them to touch when they start spreading out.)

Bake one sheet at a time. Bake 11-12 mins reversing the sheet half-way through baking. The cookies will not appear done, but take them out! (Surface will be covered with cracks.)

Let the cookies cool on the sheet rather than racks. If you transfer when hot, they will drip through the racks.

Store in plastic bags or air-tight container.

yields 48 huge cookies.


Peanut Butter Cookies
1 C all purpose flour
1/2 tsp baking soda
pinch of salt
1/2 C butter
3/4 C light brown sugar, firmly packed
1 egg
1 tsp vanilla extract
1 C peanut butter, creamy or crunchy

Sift together the flour, baking soda and salt and set aside.

With an electric mixer, cream together the butter and sugar until light and fluffy.

In another bowl, mix the egg and vanilla extract, then gradually beat into the butter mixture.

Stir in the peanut butter and blend thoroughly. Stir in the dry ingredients. Chill for at least 30 minutes, until firm.

Preheat the oven to 350. Grease two baking sheets.

Spoon out rounded teaspoonfuls of the dough and roll into balls.

Place the balls the prepared baking sheets and press flat with a fork into circles about 2 1/2" in diameter, making criss-cross pattern with a fork. (you may need to chill your fork or spray it with Pam)

Bake for 12 -14 minutes, until lightly colored. Transfer to a wire rack to cool.


Posted by Picasa

Labels:

Wednesday, September 07, 2005

Grandma Staker's Pumpkin Bread and Poppy Seed Bread


A few weeks ago, Dean's office had Patient Appreciation week. I made my grandmother's pumpkin bread and poppy seed bread to kick off the week. I ended up making 80 mini loaves of bread. The patients loved them. They all keep asking when I'm going to do it again. I contribute this to my grandmother's yummy recipes.

Pumpkin Bread
3 eggs, beaten
3/4 C oil
3/4 C water
1 1/2 C pumpkin (not pumpkin pie filling)
2 1/2 C flour
2 1/2 C sugar
1 1/2 tsp baking soda
1 1/2 tsp baking powder
3/4 tsp nutmeg
1/2 tsp cloves
1 tsp cinnamon
1 1/8 tsp salt

Preheat oven to 325. Grease and flour 2 loaf pans.

Blend beaten eggs, oil, water, and pumpkin. Sift dry ingredients and blend into pumpkin mixture. Pour into 2 loaf pans. Bake 1 hour.

Poppy Seed Bread
3 eggs, beaten
2 1/2 C sugar
1 1/2 C milk
3/4 C oil
1 1/2 tsp vanilla extract
1 1/2 tsp almond extract
1 1/2 tsp butter flavoring
3 C flour
1 1/2 tsp salt
1 1/2 tsp baking powder
1 T poppy seeds

Preheat oven to 350. Grease 2 loaf pans.

Blend eggs, sugar, milk, oil, vanilla, almond extract, and butter flavoring. Sift in flour, salt, baking powder, and poppy seeds. Pour into 2 loaf pans and bake for 55-60 mins.
Posted by Picasa

Labels:

Tuesday, August 02, 2005

The Third Cooking Class

Unfortunately we don't have any pictures of the third dinner due to Dean being sick. (Poor Deano slept through dinner and we left just after we finished eating.) The menu was awesome. The kids wanted to do something on the grill, so we decided on steaks. YUM-O!! We started with a refreshing Citrus Salad (thanks Rachael Ray). The main course was grilled Ribeye steaks with carmalized onions and sauteed baby portobellas, grilled corn on the cob with a maple vinaigrette, and cheesy scalloped potatoes. And for dessert we had a cool and refreshing Key Lime pie.

Citrus Salad

2 hearts romaine lettuce
2 cups jarred citrus salad of orange and grapefruit sections, drained – fresh oranges and grapefruits may also be used but to supreme fruit (method below*) takes extra time
2 tablespoons marmalade
2 tablespoons white wine or cider vinegar
1/3 cup extra-virgin olive oil
Salt and pepper
2 tablespoons chopped or snipped chives

Chop lettuce. Arrange lettuce on platter and top with pieces of grapefruit and orange.

*To supreme fresh oranges and/or grapefruits instead, cut off ends then remove skin in strips working all the way around the fruit from top to bottom. Cut along the side of the membrane to remove the sections of the citrus fruit.

Combine marmalade with 2 splashes of vinegar and stream in extra-virgin olive oil. Pour dressing over the salad and season with salt and pepper. Garnish platter with chopped or snipped chives.

Sauteed Crimini

1 tablespoon extra-virgin olive oil, 1 turn of the pan
2 tablespoons butter
1 1/2 pounds crimini mushrooms, brushed clean with damp towel
Salt and pepper
3 tablespoons fresh thyme leaves, chopped**
1/2 cup dry red wine
2 tablespoons chopped fresh parsley leaves

Heat a large skillet over medium high heat. Add extra-virgin olive oil and butter. Add mushrooms and season with salt, pepper and thyme then cook 15 minutes until evenly browned and tender. Add wine and deglaze the pan. Add parsley and transfer mushrooms to a serving dish.

**I prefer rosemary to thyme, but both taste great.

Grilled Corn with Maple Vinaigrette
Southern Living magazine

6 ears fresh corn with husks
1/4 C unsweetened brewed tea
1/4 C vegetable oil
3 Tbl balsamic vinegar
2 Tbl maple syrup
1 garlic clove, minced
1/4 tsp salt
1/4 tsp pepper

Remove heavy outer husks from corn; pull back inner husks. Remove and discard silks. Cover corn with water; let stand 30 minutes. (Keeps husks from burning.)

Drain corn, and pat dry. Pull husks over corn.

Stir together tea and next 6 ingredients in a small mixing bowl.

Grill corn, covered with grill lid, over medium heat for 20 mins. Carefully pull back husks, leaving attached. Brush kernels with vinaigrette. Serve with remaining vinaigrette.

Cheesy Scalloped Potatoes
Southern Living magazine

2 1/2 lbs red potatoes, unpeeled
3 Tbl butter
1/3 C chopped green onions
1/3 C chopped red bell pepper
1 clove garlic, minced
1/4 tsp ground red pepper
2 C whipping cream
3/4 C milk
3/4 tsp salt
1/4 tsp freshly ground pepper
1 C shredded Swiss cheese
1/4 C grated Parmesan cheese

Cut potatoes into 1/8" thick slices; set aside.

Melt butter in a Dutch oven over medium-high heat; add green onions and next 3 ingredients. Cook stirring constantly, 2 minutes. Add whipping cream and next 3 ingredients, stirring well.

Add potato slices; bring to a boil over medium heat, and cook stirring gently, 15 minutes or until potato slices are tender. Spoon into a lightly greased 11x7x1.5" baking dish; sprinkle with cheeses.

Bake at 350 for 45 minutes or until bubbly and golden brown. Let stand 15 minutes before serving.

Yield: 8 servings

Labels: